You can schedule activities in Pepperi's Activity Planning module for your sales reps in bulk via upload of a CSV file.
The activities scheduled will appear in the calendar view within the Pepperi app on mobile devices.
You can use the CSV file to load recurring activities - i.e. Every Monday at 9:30AM, or Every 1st and 15th of the month. You can load in bulk and then the sales reps will see everything on their Pepperi app calendars and Activity Planning map view.
This article will walk you through the steps of creating and loading this Activity Planning CSV file. A sample file is attached below.
**Make sure your CSV Delimeter is set to a comma in Settings -> ERP Integration -> Configuration** otherwise the load will fail.
Detailed instructions for each step are explained below.
1. Create the CSV file with the required fields (A separate file for each Activity Type - ie Visit, Photo, etc)
2. Add any additional custom fields you would like to use on the Activity Planning form (ex: Visit purpose, Visit subject, notes, instructions).
3. Load the file via the ERP Integration -> Upload and Logs in the Pepperi Admin Settings
4. View the Activity Planning calendar in the Pepperi App (for sales reps).
Step 1: Create the CSV file with the following required fields
The following columns are the required fields in the CSV file. The heading in the CSV should be named exactly as the mapped name for these fields in the Activity's Fields tab (for more details on the fields tab, see the explanation below):

ExternalID - the ID of the activity that is being planned. This must be a unique number. Use consecutive numbers, so that each file you upload has unique IDs. Don't upload subsequent files with the same ID's
AgentExternalID - Sales Rep ID that was indicated for the sales rep user in Pepperi.
AccountExternalID - the ID of the Account the Activity is scheduled for
PlannedStartTime - start time format as in your ERP integration (for detailed explanation click here)
PlannedEndTime - end time format as in your ERP integration (for detailed explanation click here)
Status - the Status should be "Published" = 17
Step 2: Add additional fields to use on the Activity Planning Form
It is good practice to map 1 or 2 additional text custom fields - for example the subject or purpose of the visit, notes or instructions.
The sample file attached contains 2 additional fields as an example - Visit Purpose and Subject.
You may add as many of these custom fields as you wish.
The Activity Planning form is the form displayed when the sales rep taps on the activity in their calendar in Pepperi app.
Here you can see the required fields - Account Name, Account ID, Status, Planned Start Time, Planned End Time
And you can see the additional fields that were mapped - Objectives, Instructions, Notes
To add additional fields, first create them in the Fields tab and indicate their mapped name, then add them as column heading to your CSV file.
1. Go to Settings -> Sales Activities
Edit the Activity Type you wish to add the custom fields for.
Go to the Fields tab. Here you'll see all the built in types of fields for the Activity:
Activity Fields
Sales Rep Fields
Account Fields
Contact Person
Lastly, at the bottom you'll see the Activity custom fields.
Click on "Add Custom Field" and select the field type you want to add that suits your needs - "Text", "Drop Down", etc..
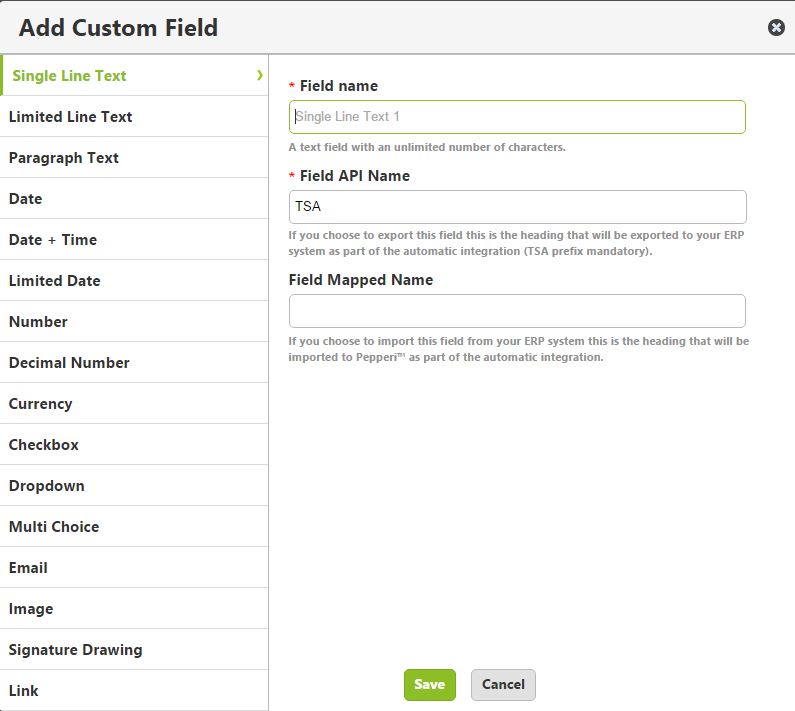
Enter the following:
Field name: This is the title of the field
Field API Name: This is mandatory, if you will be exporting to your ERP this will be the title of the field in the exported file. (The TSA prefix is hard coded, just add the title after it). This API name can be identical to the field name.
Field Mapped Name: this is the heading of the field that will be in the CSV file you are importing. Make sure the mapped name is used in the CSV column heading EXACTLY as it is entered here.
Click Save
2. Now that you have created the custom fields you can add them as columns your CSV file with the heading exactly as it appears in the Mapped Name.
Here is an example of Notes, Instructions, Objectives and Subject custom fields with the mapped name.
STEP 3: Load the file via the ERP Integration -> Upload and Logs in the Pepperi Admin Settings
Go to Settings -> ERP Integration -> File Upload and Logs
Click on Upload and select the activity name that you are uploading the Activity Planning CSV file for.
For example, if you are scheduling "Visit" Activities select API Activity Visit" from the menu:
Once the CSV file completes loading, you can check the Pepperi log file for any errors.
If you need help accessing the log file read: How to Access Admin Log File
STEP 4: View the Activity Planning calendar in the Pepperi App (for sales reps).
You can now open the Activity Planning interface on the Pepperi app and view the activities you scheduled on the calendar and map view.
0 comments
Please sign in to leave a comment.